
Ascites and Paracentesis - Knobology and Imaging Technique
Knobology and Imaging Technique
1. Probe selection
2. Knobology optimization
3. Imaging Technique
What you need to know for ascites image acquisition:
2. Knobology optimization
3. Imaging Technique
1. Probe Selection
Each probe yields a different image profile in accordance to Footprint, Field of Vision (FOV), Hz, and Depth.
Curvilinear: Its Wide FOV allows you to see much more anatomy from one view; and its low Hz bandwidth permits deep imaging.
Phased-Array: Similar characteristics to Curvilinear, but smaller FOV.
Linear: High Hz probe that generates high resolution images for superficial structures. However, it has a small FOV and limited depth. It is useful for looking for small vessels running in the abdominal wall.

2. Knobology Optimization
Seldom does Pleural Effusion image acquisition causes any significant problems. Most US machines' processors at default are already optimized to image Pleural Effusion. The following are some key points to consider:
Seldom does Pleural Effusion image acquisition causes any significant problems. Most US machines' processors at default are already optimized to image Pleural Effusion. The following are some key points to consider:
- Depth: Maximize the depth initially, then reduce accordingly - so that you will not miss findings buried in the deep.
- Gain: Tune until the fluid appears black (anechoic), then adjust accordingly. Of course, if the fluid has particulate matter in it, rendering them invisible by reducing Gain is counterproductive.
3. Imaging Technique
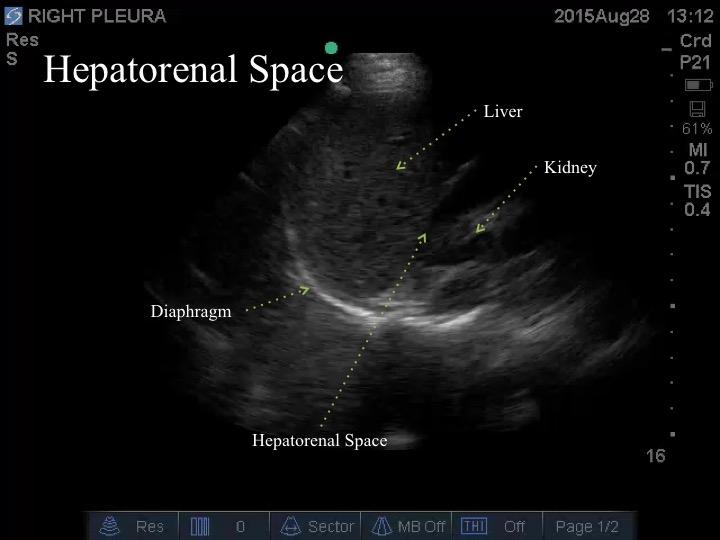
a. Screening Scan Technique: This scanning technique images specific regions of the peritoneal cavity where fluid tends to collect first - detecting small amount of fluid. We shall discuss the two potential spaces: Hepatorenal Space and Splenorenal Space - components of the FAST scan.
b. Paracentesis Scan Technique: It is not a technique per se, but primarily describes the general region one should image for and the respective anatomy for an "Ideal" site for paracentesis.
a. Screening Scan Technique
- Place the probe in coronal plane with the indicator pointing cephalad.
- Start from the posterior axilliary line at the level of the costal margin (Kidneys reside in the retroperitoneal space – more dorsal than you think)
- Move the probe cephalad.
- Locate and identify the diaphragm.
- Identify the liver/spleen.
- Identify the hepatorenal/splenorenal space.

As a quick re-cap, the key structure to identify is the diaphragm. Inferior to it is the intra-abdominal cavity – usually with either the liver or spleen in view. Superior to the diaphragm is the is the thoracic cavity.
Visualize the respective intra-abdominal organs inferior to the diaphragm (liver or spleen) and the kidney. View the entirety of the interface: Hepatorenal Space and Splenorenal Space.
Visualize the respective intra-abdominal organs inferior to the diaphragm (liver or spleen) and the kidney. View the entirety of the interface: Hepatorenal Space and Splenorenal Space.
b. Paracentesis Scan Technique:
You can place the probe always anywhere and perform the tap so long as there is NO critical structures nearby.
Usually, the right and left lower quadrants and flanks are the sites assessed.
The suprapubic area is usually avoided to presence of the bladder; and the least dependent region of the abdomen (depending on the patient's position) is, also, usually avoided as the small bowel tends to float towards it.

Take Home Messages:
- Screen for intra-abdominal fluid at the hepatorenal and splenorenal spaces
- When imaging for a site for paracentesis
- scan the regions that are clearly "bulging" - usually at RLQ, LLQ, and Flank
- avoid suparpubic and least dependent regions
- look for an "Ideal" paracentesis site - safe spot