
Images
1. Long Axis
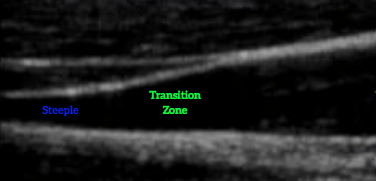
First find the internal jugular vein in short axis, then rotate into the long axis view. Subsequently, slide along the long axis until you see a taper as specified in the image below.
This technique is not easy
as the internal jugular vein course is not necessary straight. You will find that rotating the head actually will accentuate that even more. A neutral head position or <30ᵒ
rotation would be ideal.
The JVP in the long axis tapers towards the cephalad. The region where the vessel is tapering is called the Transition Zone, and the end is called the Steeple.
Note, the Steeple does not completely tapers off (blood still drains from the brain into the internal jugular vein).
Here is clip of the JVP.
Notice how the Steeple is pulsating with three wave forms? (One big wave then followed by two small and rapid quivers) That is the JVP.
The Taper is usually used as the point to measure the JVP height. This is because it is easier to identify it than the Taper. If you correspond where the Steeple is to location of the transducer placed on the neck (in this case, about about one-third or half way from the indicator side), the respective location is the JVP site.
Caveats of the long axis technique:
- Long axis imaging of a small tubular structure is a higher level skill
- The risk of side-walling or fore-shortening, especially if tortuous, introduces measurement error
- Applying too much pressure can compress the low pressure vein which results in a falsely low JVP
2. Short Axis
The short axis image is much easier to acquire, and it mitigates the side-walling effect. In fact, many users prefer this method.
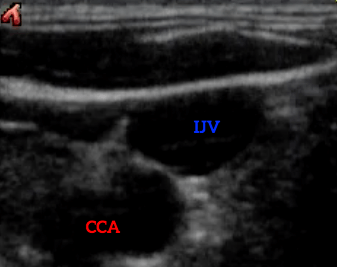
Short axis at the base
of the internal jugular vein (IJV) exhibits the widest diameter and does not vary.
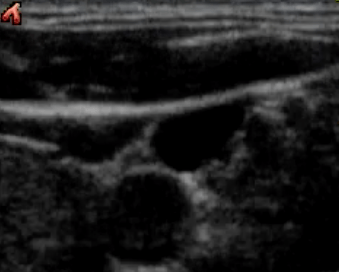
As we scan cephalad of the IJV the diameter begins to narrow and phasic variation is visible -- the Transition Zone.

The IJV then narrows into the Steeple.
Here is a clip of the right IJV imaged in the short axis. (The above still images were taken from this clip.)
The probe was first placed at the base of the IJV near the clavicle, then the probe was slid cephalad. Notice that there is a point where the IJV suddenly narrows, then remains narrow.
Where the rapid narrowing occurs is the Transition Zone, and where the narrowed diameter maintains is the Steeple.
Again, the location where the probe images the Taper corresponds to the site of the JVP on the neck.
Caveats of the short axis technique:
- Applying too much pressure can compress the low pressure vein which results in a falsely low JVP
- The Taper and Steeple are not as easy to identify as you will have to construct that longitudinal image in your mind with short axis imaging