
Basics of Scanning - Probe (Indicator) Orientation
Probe - Indicator - Orientation
In order to standardize which side on the monitor correspond to that of the patient's, by convention the (1) indicator on the screen is pointing at 11 o'clock and (2) the probe's indicator is orientated to a specific direction relative to the patient.
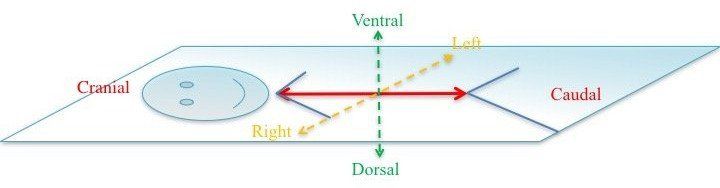
This following diagram illustrates a person laying supine on a bed. The three dimensional directions RELATIVE TO THE PATIENT are illusrated for you in three different colours:
This following diagram illustrates a person laying supine on a bed. The three dimensional directions RELATIVE TO THE PATIENT are illusrated for you in three different colours:
- Red: Cranial (towards the head) and Caudal (towards the legs)
- Yellow: Right (patient's right) and Left (patient's left)
- Green:
Ventral (abdominal aspect) and Dorsal (back aspect)
By convention:
The indicator on the screen is anchored at the right upper corner of the screen (11 o'clock).
The indicator either points cranially or ventrally.
With regards to right or left, usually the former though per the user’s preference -- so long as you know which side is which. For example, if you are performing a coronal scan of the anterior abdomen for ascites, the indicator will point to the right. This is so that should you slide the probe to the right of the patient, the image on the screen will, also, move corresponding in the same direction.
However, if you are performing a central line and imaging the internal jugular vein in short axis, the indicator will preferably be directed towards the patient's left side.
Below are four images illustrating the conventional direction of the indicator relative to the patient. The model probe is the conically shaped cut-out with the yellow strip signifying the direction of the Indicator.


Take Home Messages:
- Standardize the image orientation by having the indicator pointing cranially or ventrally
- Right or Left depends on the user