
Pleural Effusion and Thoracentesis - Thoracentesis
Thoracentesis
1. Sonographic Landmarking
2. "Ideal" Site
So far, we have been mainly discussing the techniques to detect an effusion and interpret its composition. The image evaluation techniques for the purposes of a thoracentesis is a bit different.
2. "Ideal" Site
1. Landmarking
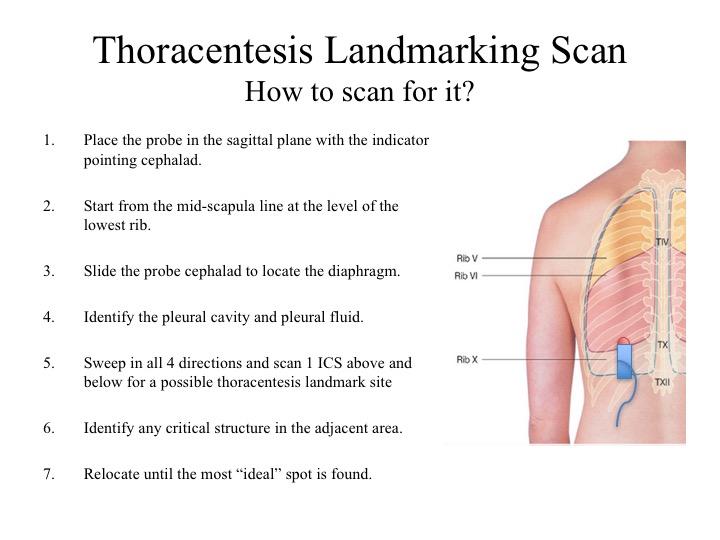
This schematic diagram describes the posterior (Z6) approach. However, the principles can be applied for a lateral approach.
The most important structure to identify is the diaphragm as this is the border between the thoracic and abdominal cavities. NEVER insert the needle BELOW the diaphragmatic border.
ALWAYS look around a spot you identified to ensure there is no major structures floating nearby.
2. "Ideal" Thoracentsis Site:
- No adjacent critical structure
- Needle will not reach critical structure accounting for dynamic changes
- Most dependent aspect of the pocket
- Shortest entry distance into the thoracic cavity
So let’s apply the criteria to this clip. We can see there is a pleural effusion is present. Is there any adjacent structure – well, there is, the atelectatic lung. Will the needle hit the critical structure? The lung is ~8cm deep and it barely moves with respiration (accounting for dynamic changes). The needle in most thoracentesis kits are around 4-5cm in length, so it cannot hit the lung (in this plane).
Take Home Messages:
- Always, first, localize the diaphragm to landmark the thoracic cavity
- Identify the "Ideal" Site
- Applying these principles and methods, you may, also, tap an effusion laterally (Z3/Z4)