
Pleural Effusion and Thoracentesis - Knobology and Imaging Technique
Knobology and Imaging Technique
1. Probe Selection
2. Knobology Optimization
3. Imaging Technique
What you need to know for pleural effusion image acquisition:
2. Knobology Optimization
3. Imaging Technique
1. Probe Selection
Each probe yields a different image profile in accordance to Footprint, Field of Vision (FOV), Hz, and Depth.
Curvilinear: Its Wide FOV allows you to see much more anatomy from one view; and its low Hz bandwidth permits deep imaging.
Phased-Array: Similar characteristics to Curvilinear, but its footprint profile is designed to be wedge in between intercostal spaces for image acquisition.
Curvilinear: Its Wide FOV allows you to see much more anatomy from one view; and its low Hz bandwidth permits deep imaging.
Phased-Array: Similar characteristics to Curvilinear, but its footprint profile is designed to be wedge in between intercostal spaces for image acquisition.
Linear:
High Hz probe that generates high resolution images for superficial structures - ie. the thoracic wall and lung are well defined. However, it has a small FOV and limited depth.
In accordance to their operating characteristics, this table summarizes the what each transducer is commonly used for in the context of Pleural Effusion evaluation.
Given the Linear probe is capable of high resolution imaging of superficial structures, it can be deployed for US guided real time thoracentesis.
Given the Linear probe is capable of high resolution imaging of superficial structures, it can be deployed for US guided real time thoracentesis.

2. Knobology Optimization Seldom does Pleural Effusion image acquisition causes any significant problems. Most US machines' processors at default are already optimized to image Pleural Effusion. The following are some key points to consider:
- Depth: Maximize the depth initially, then reduce accordingly - so that you will not miss findings buried in the deep.
- Gain: Tune until the fluid appears black (anechoic), then adjust accordingly. Of course, if the effusion has particulate matter in it (complex effusion), rendering them invisible by reducing Gain is counterproductive.
- "Lung Mode": Some machines have a preset "Lung Mode" which is optimized for visualizing the VPPI (Lung Parenchyma PoCUS), NOT for pleural effusion evaluation. Use the "Abdominal Mode" instead.
3. Imaging Technique
- Place the probe in coronal plane.
- Start from the mid to posterior axillary line at the lowest intercostal space (Zone 4).
- Move the probe cephalad.
- Locate and identify the diaphragm.
- Identify the liver/spleen.
- Identify the pleural cavity.
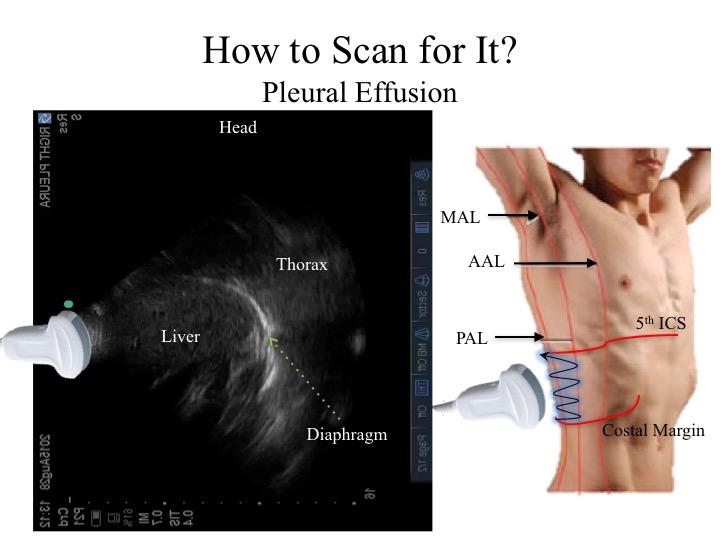
This is the general image you should strive to attain:

The most important structure to visual is the diaphragm
as that is the landmark to delineate the thoracic cavity versus the intra-abdomianl cavity.
This is an image taken from RZ4 in a normal thorax with no effusion. The anatomical structures are as per labelled.
The Curtain Sign, Spine Sign, and Mirror Artifact are discussed in the Thoracic Basics module.
This is an image taken from RZ4 in a normal thorax with no effusion. The anatomical structures are as per labelled.
The Curtain Sign, Spine Sign, and Mirror Artifact are discussed in the Thoracic Basics module.
Take Home Messages:
- Use the appropriate preset modes, such as "Abdominal" Mode, to image pleural effusion
- Always, first, localize the diaphragm when imaging for a pleural effusion